The driver is the most powerful club in your bag. Many golfers feel that they should try to hit their drive shots as hard as they can. However, position rather than power is the most important factor off the tee.
Professional golfers hit most of their drives at only 70–80 percent of full power. This is the kind of attitude you should apply to your tee-shot strategy: accuracy, not length, is paramount.
Whenever you step on to the tee, you should not simply aim at the fairway in general, but should instead identify a more specifific target, such as a small mound or discolored area of grass.
This article will help you hit consistently better tee shots. We will also discuss some sequence that will show you how to make the perfect tee shot—as demonstrated by Rory Mcllroy.
Table of Contents
How To Tee Off In Golf For Beginners?
Here are the 5 phases of a perfectly executed tee shot:
Step#1
To form the perfect set-up, first flex your knees a little for a balanced stance. Your spine angle should be such that your arms hang down freely and there is a comfortable space between your hands and the tops of your thighs.
Your toes, knees, hips, and shoulders should all run parallel to the target line, and the clubface should look directly at the target.
Step#2
In your backswing, blend your body-turn and arm-swing, and make the appropriate wrist action to set the club on the perfect plane. Make sure your left shoulder turns under the chin.
Step#3
At the top of your backswing, your hands should be above your right shoulder: a sure sign that the swing is on the correct plane.
Also note the braced leg action in the 3rd image below

Step#4
In the downswing, your hands and arms should swing down almost to hip height before your upper body even starts to turn through. This helps slot the club on to an inside track: the perfect prehitting position. From this position, you can deliver full power to the back of the ball.
Step#5
By turning your left side, you can make room to swing the club into the ball on the correct path. As the clubhead swings through the hitting zone, the club moves back inside the target line, the perfect in-to-in swing path.

Related post: What golf tees should I play from?
Step Into A Good Stance
In your stance, the ideal distance between your feet is the same as the width of your shoulders. However, if you are especially tall and slim or have short legs, this rule might not apply.
If either of these situations are applicable to you, then this fail-safe exercise, which is as easy as walking down the street, will help you establish the perfect base for your swing.
Take the longest club in your bag, your driver, and start walking as you would normally.
Plant Your Weight
Just as a boxer plants his or her weight on his back foot before delivering a knockout punch, so a golfer also needs to shift his or her weight in the same way to deliver maximum power to the ball.
It is vital to transfer your weight on to your back foot at the top of your backswing. This is easier if you start your swing with your weight favoring your right side. Rehearse the given exercise below to learn the mechanics of good weight distribution.
Step#1
Stand upright, with your weight spread evenly over both feet. Assume your address position over the ball.
Step#2
After a few paces, stop walking. It is important that you do not move your feet. This is your normal stride length, which provides optimum balance as you walk. This distance will also provide a good balance when you swing a golf club.
Step#3
All you need to do now is turn and face the ball, making sure that your feet stay exactly the same distance apart.
Step#4
Tilt your spine angle away from the target so that 60 percent of your weight is on your back foot.

Tee height (The 50% rule)
Each driving club operates best when the ball is teed up at the correct height. However, since the size of driver heads varies greatly (and many people prefer to tee off with a lofted wood, the ideal tee height should not be taken for granted.
To guarantee that the ball is always teed at the correct height, no matter what club you are using, make sure that 50 percent of the ball is visible above the top edge of the clubface.
This practice is important because to strike driving shots solidly you need to swing the clubhead into the ball on a shallow angle of attack, sweeping the ball away with a level blow.
You cannot do this if the ball is teed at the incorrect height. Teeing the ball too low means you may hit down steeply into impact; too high and you run the risk of hitting the ball on the upswing.
Central Line
Whatever the size of clubhead, establish a tee height where the top edge of the clubface sits level with the middle of the ball.
Close the clubface at address
There are plenty of situations where it is advantageous to get the ball to run more than normal, such as when you are playing into a strong wind and need to generate maximum distance off the tee. Rehearse this drill on the practice ground for better results.
Step#1
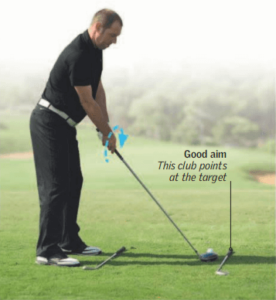
Place two clubs on the ground: one parallel with the ball-to-target line, and another pointing slightly right to establish a fractionally closed stance.
Step#2
Rest the clubhead behind the ball, but do not apply your grip.
Step#3
Keeping the clubhead behind the ball, use your right thumb and forefinger to twist the clubface 3⁄8 in (1cm) counterclockwise. Making sure that you do not upset the new position of the clubface, carefully form your grip as you would normally.
Post you may like: What happens if you knock the golf ball off a tee?
Swing through the tees
The purpose of this drill is to establish whether you swing the clubhead on the right path into and through impact. The correct swing path is vital to your chances of producing an accurate shot, since it eliminates sidespin, which causes the ball to curve in the air.
- Line up a corridor of tees the width of two clubheads apart. Place one tee in the middle.
- Swing the club freely through this corridor. The clubhead should clip the lone tee as it swings through. If the clubhead touches either line of the tees, you are swinging on the wrong lines.
- When you are able to swing the clubhead cleanly, re-create the swing with a ball on the tee.
Keep it all together
If you lose synchronization between your arm-swing and your body-turn at the start of your swing, it is difficult to regain it in the split-second it takes to reach the hitting stage. Here is an exercise to fix this problem.
Step#1
Take your driver and assume your normal stance. Feed the club up through your fingers so that the butt-end of the club rests at your navel and your hands grip the metal of the shaft.
Step#2
Rehearse a backswing movement, turning your body and moving the club away from where the ball would normally be, but focus on keeping the butt-end of the club resting against your midriff. Go no farther back than the point where your hands reach just beyond your right thigh. Repeat this movement over and over.
Feel a “Turn and a Swish” for a natural swing
There are two key elements of a perfect swing: body-turn and arm-swing. Too much of one and not enough of the other is disastrous—you will struggle to deliver the clubhead to the back of the ball on anything like the correct path or angle of attack. Too much arm-swing is a common problem, resulting from the shoulders not turning enough. This drill provides a constructive remedy
Step#1
Stand with your arms stretched out. Swing the club around yourself, focus on your upper body motion, and let your arms swish the clubhead. As you make the return swing from right to left, your weight shifts toward the target and on to your left side.
Step#2
Stand over a ball and bend until the clubhead is 2ft (60cm) above the ground. Make the same swing again.
Step#3
Bend farther from the waist until the clubhead rests on the ground and flex your knees. As you swing, repeat the sensations that you experienced in the previous steps—a full turn of the body, good weight transfer, and a free swish of the clubhead as you accelerate down and through the hitting area.
Shake hands with your target
A good release of the clubhead through impact is part of a powerful swing. It indicates that the club has been swung freely and with maximum clubhead speed. However, instead of releasing the clubhead, some amateur golfers attempt to guide the club or prod at the ball. This drill ensures that this key move is performed correctly.
Step#1
Adopt your normal posture but without a club in your hands. Let your right arm hang naturally, but put your left hand in your pocket.
Step#2
Make half-swing movements (to hip-height on either side of the swing) with your right arm. Feel that you are “shaking hands” with the target as you swing your arm through the hitting zone.
Step#3
Now rehearse a few practice swings with your driver. Swing in slow motion, and freeze when your right arm reaches horizontal with the ground in your follow-through. Your right hand should be in line with the target, ready to shake hands.
Turn your back on the target to generate power
Go low and slow: that is a great way to start your backswing with a driver. But where do you go from here? This exercise is very useful for anyone who lacks direction in the backswing, or is simply struggling with driving. It involves two key ideas, which together can have a great influence on the quality of your driving.
Step#1
As you make your backswing, try to turn your back on the target. This will encourage you to make a full turn of your shoulders, will promote a much better weight transfer on to your right side, and will also help you set the club on the correct line at the top of your backswing.
Step#2
When you reach the top of your backswing, point the club at the target. This idea is particularly benefificial for golfers who slice the majority of their drives. This is because these players tend to point the club to the left of the target, which results in an outside-the-line downswing, causing them to cut across the ball through impact and produce a sliced drive.
Coaching Tip
Turning your back on the target ensures a good body rotation, which is essential for generating power, while pointing the club at the target means that the club will be on line.
These two key elements combine to put you in a better position to swing the club down freely and on the correct swing path through impact, resulting in more clubhead speed and a more solid contact.
Synchronize your arm-swing with your body-turn
Losing coordination between your arm-swing and body-turn is a common fault. It can cause a loss of rhythm and make your swing feel ungainly. When this happens, even well-struck shots lack zip.
With most golfers, the body moves too early and races ahead of the hand-and-arm action (the opposite problem is unusual).
This is one of the main causes of a sliced drive: the shoulders and upper body unwind too fast in the downswing, throwing the hands and arms outside the ideal swing plane, causing the clubhead to cut across the ball from out to in. If you are slicing your drives, try this drill.
Step#1
Take your driver and make a normal backswing. From the top of your backswing, concentrate on getting your hands and arms swinging the club down to hip height before your shoulders and upper body even start to unwind.
Step#2
As you continue swinging downward, your body should start to unwind in harmony with your hands and arms.
Coaching tip
This drill eliminates the tendency for your shoulders to spin out too early in the downswing, which throws the club outside the correct path and causes a sliced drive. Improved synchronization will lead to better timing and more powerful ball striking.
Related post: Can you use a tee on the fairway
Practice Pause
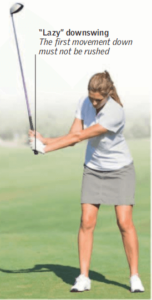
When using the driver, golfers tend to be aggressive when moving from the backswing to the downswing. This wrecks any chance of a solid strike. If you fifind yourself unable to shake this habit, this exercise will help.
Step#1
Start by making a normal backswing, all the way to the top. Pause at this point for no more than a fraction of a second.
Step#2
As you begin your downswing, cultivate a “lazy” feeling, as if this movement down is little more than the result of gravity.
Lift your heel for a fuller turn
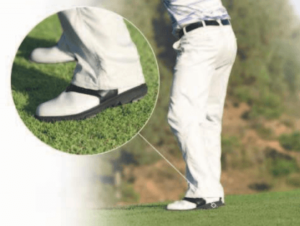
For golfers who lack flexibility in the swing and struggle to make a full turn, lifting the left heel should give you an advantage. It enables you to make a more complete turn in the backswing, adding length to your swing and power to your shots.
Step#1
Start your backswing as normal. When you reach the position in your backswing where you feel your hips and shoulders will not “give” any more, this is the point when the left heel is effectively pulled off the ground to release the right side and to allow for a bigger turn.
Turn your left shoulder
All kinds of mental imagery can help you produce a better swing. Here is an exercise to ensure that you make a 90-degree turn in your backswing, which is a minimum requirement for generating power with your driver.
Step#1
Assume your normal address position, but think about the position of your right shoulder.
Step#2
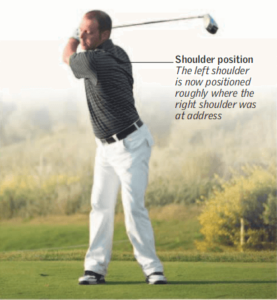
At the top of your backswing, turn your left shoulder into the position of the right shoulder at address. This transfers your weight on to the right side and makes for a good swing.
Step#3
To initiate your downswing, plant your heel back on the ground. This allows your weight to move in the right direction— flowing toward the target.
Choke down on your driver
Too many golfers are obsessed with hitting the ball as far as possible. Yet most players would drive the ball a lot straighter and farther if they thought of the driver as a positional club. This drill will teach you how to hit your drives straighter, with no sacrifice in terms of distance.
Step#1
Take your driver and adopt your normal grip and address position.
Step#2
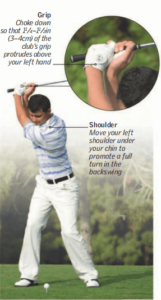
Alter your grip so that your hands are 1 1⁄4–1 1⁄2 in (3–4cm) nearer the clubhead and you can see the end of the club’s grip protruding above your left hand. This is described as “choking down” on the club.

Create a box at the top of your swing
At the top of your backswing, the relationship between your right arm, hands, club shaft, and upper body is an important one. This drill will help ensure that you are in the ideal position from which to start your downswing.
THE ANGLE AT THE TOP OF THE BACKSWING SHOULD BE 90 DEGREES.
Step #1
Swing normally: you should feel greater control. Although you have shortened the length of the club’s shaft, thus reducing the arc and your swing length, do not feel like you are making changes to your swing.
Step#2
Swing your driver to the top and freeze right there. Now look over your right shoulder. You should see the shaft of the club forming a right angle with your right forearm, which in turn forms a right angle with your right upper arm, so that you have three sides of a box. This position encompasses the correct amount of wrist hinge.
Related post: Who tees off first in golf?
If you slice, strengthen your grip
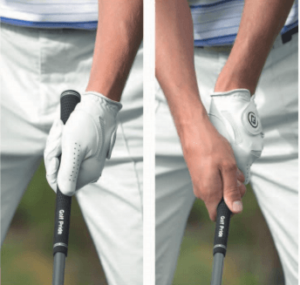
How you grip the club determines how the clubface strikes the ball. If your grip is weak—where the Vs formed by the thumb and forefinger point toward your chin—it is unlikely that the clubface will be square with the ball at the point of impact. In most cases, the face will instead be open, leading to a glancing blow and a weak (often sliced) drive.
Step#1
Grip your driver normally. Take your right hand off the club so that you have a clear view of your left hand. To steady the club, hold the bottom of the club’s grip with your right hand.
Loosen your left-hand grip to help you rotate your grip to the right until you see three knuckles on the back of your left hand. Your left thumb should sit slightly to the right of center on the grip, and point straight down.
The V formed by your left thumb and forefinger should now be pointing at your right shoulder.
Step#2
Apply your right hand to the club’s grip so that the V points at your right shoulder. You should be able to see just one knuckle on your right hand and three knuckles on the left hand.
Coaching tip
Strengthening your grip ensures that the clubface is square at impact (for more solid strikes). This shoul eliminate sliced drives. Your new grip will also feel more powerful than your old grip. A stronger grip is of benefit to anyone struggling to generate sufficient distance off the tee.
If you hook, bring your grip back to neutral
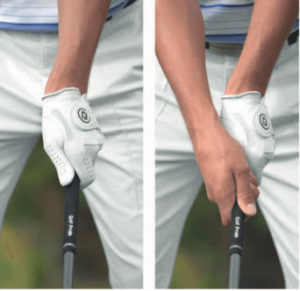
The way you place your hands on the club’s grip controls the behavior of the clubface during your swing. If you are plagued by a persistent hook, your grip might be too strong, which means the clubface will be closed at impact. One of the best ways to cure a hook is to weaken an overly strong grip to make it neutral. This will help you deliver the clubface square to the back of the ball.
Step#1
Form your grip on the driver as if you were about to hit a tee shot. Remove your right hand from the club. If your grip is too strong, you will probably see four knuckles on your left hand.
Hold the bottom of the club’s grip firmly with your right hand. Carefully rotate your left-hand grip to the left, so that you can see two or two-and-a-half knuckles on the back of your left hand.
Step#2
Introduce your right hand so that it sits on top of the grip. You should now be able to see two knuckles on your right hand. Your right thumb should sit more on top of the grip, rather than to the right. See: How to grip a golf club correctly
AS YOU FAMILIARIZE YOURSELF WITH THE HAND POSITIONS, THE CLUBFACE WILL STAY NEUTRAL, MAKING IT EASIER TO HIT STRAIGHT TEE SHOTS

